Thursday, June 26, 2014

"Fast Food" | Putu Mayam

In Malaysia, Putu Mayam and its relative are often sold as street food from market stalls or carts, as well as being made at home, and are usually served cold.


We, the Super Marios, are here today to teach you how to make your very own Putu Mayam!

All you need is: 

300gm of rice flour
15 Screwpine leaves
500gm fine brown sugar or chopped palm sugar
100 Grated coconut, white part only
A dash of green colouring
500 ml of water
1 tbsp of salt

Here are the procedures!
  1. Blend the screwpine leaves till fine.
  2. Remove it and extract juice from it.
  3. Take a wok and heat rice flour on low flame without using oil.
  4. Transfer rice flour to a mixing bowl, add salt, mix well.
  5. Gradually stir in screwpine juices.
  6. Combine green colouring.
  7. Pour the mixture into a saucepan and let it cook on high heat, stirring it continuously.
  8.  When mixture begins to thicken, stir quickly till dough leaves side of the pan.
  9. Let it cool slightly.
  10. Prepare the steamer for steaming of putu mayam.
  11. When the water is boiling, place some dough into the putu maker and press out onto an upturned rattan colander lined with white muslin.
  12. Move it in circular movements to get a round lacy piece.
  13. Steam over high flame for 8-10 minutes.
  14. And you're done! :D
You can either serve it with sugar which people normally do or grated coconut! 


Thats all for today! Hope you like it! :D


Friday, June 20, 2014

Fish Head Curry | Spicy Food Lovers

Vanakkam! To all the spicy food lovers out there, the Indian Fish Head Curry or Indian Asam Fish is definitely a must try! Fish Head Curry is a dish in Malaysian and Singaporean cuisine with Chinese and Indian origins. The head of a red snapper is semi-stewed in a Kerala-style curry with assorted vegetable such as okra and eggplants. It is usually served with either rice or bread, or as a shared dish.


You guys must be curious how to make a delicious fish head curry! Here it is! 

To blend: 
5 cloves of garlic
1 big onion
A bit of water

Ingredients: 
1 fish head (approximately 2kg)
2 round eggplants
10 lady's fingers
2 tomatoes
4 green chillies
1 stalk curry leaves
2 tablespoon of pure assam jawa
3 tablespoon of fish curry powder
1/2 packet of coconut milk (about 300g)
3 tablespoon of oil
1 cup of water
2 teaspoon of salt


Procedures:

1. Wash the fish with coarse salt. This cleans out the muddy smell of the fish. In fact, this is one of the main tips to make a great fish head. The head has to be nice and clean.

2. Heat the oil and throw in the curry leaves first. Once oil is fragrant, put in onion- garlic blend with curry powder. Fry until fragrant.

3. Chop the tomatoes and eggplants into 8 pieces and put them in with the green chillies (sliced). Stir them thoroughly.

4. Pour in 1/2 cup of water first, stir it well (about 5-6 minutes)

5. Stir and add in santan. Then put the fish head and lady's fingers.

6. Let it simmer for about 5-10 minutes. And you're done!


Rojak | All Time Favourite

Its always summer in Malaysia. Today, we, the Marios, are here to cool you off by introducing you the traditional Fruit Rojak.


It only takes simple steps to make your own delicious Fruit Rojak. But first, let me talk about Fruit Rojak briefly. Rojak is a traditional fruit and vegetable salad dish commonly found in Indonesia, Malaysia and Singapore. The term "Rojak" is Malay for mixture.

The core of its flavour comes from its sauce. So now, these are the few methods to make the sauce.

Things you'll need

1/2 cup water
Saucepan
3 tablespoon of dark brown sugar
Whisk
1 tablespoon of oyster sauce
1 tablespoon of shrimp paste
1 tablespoon of tamarind paste
1 tablespoon of minced Scotch bonnet pepper

Procedure:

Step 1: Pour the water into the saucepan and place it over high heat. Bring the water to a boil and reduce the heat to low.

Step 2: Add the dark brown sugar to the saucepan and stir with a whisk until it dissolves.

Step 3: Add the oyster sauce, shrimp paste and tamarind paste to the saucepan and continue whisking for two minutes.

Step 4: Stir the Scotch bonnet pepper into the contents of the saucepan and simmer the mixture for 10 minutes. 

Step 5: Remove the saucepan from the heat and allow the sauce to cool for 30 minutes or to room temperature before tossing with rojak.

Tips: Refrigerate or freeze leftover rojak sauce immediately. Consume refrigerated sauce within 5 days and frozen sauce within 3 months.

You can serve the rojak sauce with literally anything, such as fruits, vegetables or even crispy food of your own choice. 


+


=

JOB DONE!


Wanna try out some nice rojak?!

Here: Jalan SS 15/4G (SS 15 Subang Jaya), 47500 Subang JayaSelangor


Wednesday, June 18, 2014

Cendol | Green Jellies

Eating all these Indian food sure makes you thirsty, so today Super Marios will share a local favorite dessert- Cendol! 


There is a popular belief in Indonesia that the name "cendol" is related to, and originated from, the word jendol; in Javanese,Sundanese and Indonesianjendol means "bump" or "bulge", in reference to the sensation of drinking and swallowing the green worm-like rice flour jelly. Here are some ways to make this amazing dessert.

125 gr rice flour 
50 gr sago flour
75 cc pandan leaves water (boil water with pandan leaves until it has green colour) 
450 cc water
salt as needed
200 gr palm sugar, boil with 125 cc of water until it dissolves. Strain the palm sugar water and boil again. Set your cendol aside.
500 cc of coconut milk. Boil and set aside to cool.
1 can of jackfruit in syrup, cut into small bite-sized pieces ( optional )


Steps:

  1. Mix rice flour and sago flour, then mix it with some of the water.
  2. Boil the rest of the water, add green pandan leaves water and salt.
  3. Put the flour mixtures into the boiled water.
  4. Stir well and cook until it thickens (paste-like).
  5. Drain with special cendol strain ( usually the strainer has round holes ), so when we press the cendol mixture it will go out of the strain as roundish short cendol.
  6. Put these cendol directly into a bowl with water and ice in it.
  7. Cendol will be solid and then drain them again. Set aside.
Serving: Put some cendol into a tall glass, pour palm sugar syrup and coconut milk ( seperate layers ). You can add shaved ice or just ice cubes.


Now u can enjoy your home-made cendol !


Tuesday, June 17, 2014

Supper of The Day | Roti Canai

Hey guys, SUPER MARIO is back again! This time with some Indian food :D

Roti Canai

The dish is composed of dough containing copious amounts of fat, flour and water. The form of fat used is usually ghee (clarified butter). Some people add sweetened condensed milk to the mix. The entire mixture is kneaded thoroughly, flattened, oiled and folded repeatedly. It is then allowed to proof and rise, and the process is repeated. The final round of preparation consists of flattening the dough ball, coating it with oil and then cooking on a flat iron skillet with a lot of oil. The ideal roti is flat, fluffy on the inside but crispy and flaky on the outside.

Wondering how to make your own Roti Canai?

300g (2 cups) plain bread flour
1/2 teaspoon salt
250 ml (1 cup) chilled water
30g butter, melted
60 ml (1/4 cup) vegetable oil


Procedure: 

Firstly, combine the flour and salt in a large bowl. Make a well in the centre. Add the water and stir to combine. Use your hands to bring the dough together in the bowl. Turn onto a lightly floured surface and knead for 5 minutes or until smooth. Flatten the dough into a disc and cut into 8 equal portions.

Then, shape each dough portion in a ball. Use a lightly floured rolling pin to roll out 1 portion of dough to a 20cm- diameter disc. Cover the remaining dough portions with plastic wrap. Brush the disc with a little melted butter. Roll into a log to enclose the butter. Coil the dough into a scroll shape. Flatten the scroll into a disc. Use a lightly floured rolling pin to roll out the disc until 15-20cm in diameter. Repeat with the remaining dough portions.

Lastly, place a deep, heavy-based frying pan over medium-high heat and brush with a little oil. Cook 1 roti for 2 minutes each side or until puffed and golden. Transfer to a serving platter and cover with a clean tea towel to keep warm. Repeat with the remaining roti.

P.s. You can add curry, sugar, or daal, it all depends on your own liking!


TADAA. :D


You can now enjoy your dish!


Thursday, June 5, 2014

Dessert Of The Day | GuiLingGao

Hi guys so today is the end of the week so I am going to introduce you the very last traditional cuisine of Chinese -------- Gui Ling Gao, the Chinese herbal jelly!

So what's herbal jelly and why is it good for you? Gui ling gao is translated as tortoise jelly. But not to worry as there is no turtle parts in the ingredients. Maybe back in the old days they do but not now as it is illegal to use turtle. The herbal jelly is made out of different herbs and flowers. It help nourish our yin and clear body heat while resolve blood toxin. Also specially effective on recovering skin disorder. The taste might be a little bit bitter but taste great with syrup. Eat this chilled and it's a great dessert. A healthy one at least. :)

Gui Ling Gao powder ;)


Before we start off, please pen down all the ingredients needed to make this healthy yet delicious dessert !

Ingredients:

5 bags of gui ling gao powder (10 g each)
1300 ml water (set aside 200 ml for mixing powder)
1 medium sized piece rock sugar

Now we shall continue with the steps

Method
  1. Pour 1300ml  water in a pot with the rock sugar. Boil until rock sugar is dissolved.
  2. Pour 200ml water in a bowl.  Add the 5 bags of jelly powder to the bowl and stir to mix well.
  3. Add the mixture to the boiling sugar syrup. Turn off heat.
  4. The mixture will turn thicker and continue to stir to mix evenly.
  5. Pour into glass containers or cups and let cool to room temperature.
  6. Serve at room temperature or keep in fridge to serve it cold.
 A lil friendly tip over here: You can choose your own toppings for example like honey, a scoop of ice-cream or even you just eat the jelly itself like that, hehe :P

Gui Ling Gao with honey

Gui Ling Gao with ice cream!

That's all from SKINNY Mario.
love, XOXO.

Wednesday, June 4, 2014

Mid Autumn | Moon Cake

Hello guise! Qt- Mario is back with new food!

After the "Bak Zhang" Festival, the next significant festival among the Chinese is...


THE MOON CAKE FESTIVAL!

although it's still early for this favorite festival of mine, I would still want to share with you all about this heaven-food. 

Desert i would say it is. 


First I will just share some simple procedures for you to make moon cake at home. You can ask your family members or friends to join you! It would be quite fun and most importantly the interactions and time spent together. Those are quite priceless, aren't they? :) 

Prepare ingredients first and foremost.

For dough

  • -4 cups all-purpose flour (plain flour)
  • -3/4 cup dried milk powder
  • -1 tablespoon baking powder
  • -1 teaspoon salt
  • -3 large eggs
  • -1 1/4 cups sugar
  • -3/4 cup unsalted butter, melted and cooled to room temperature
  • -1 1/2 teaspoons vanilla extract (essence)


  • For filling

  • -1 cup apricot preserves (jam) (equivalent of one 12 ounce jar)
  • -1 cup chopped pitted dates
  • -1 cup sweetened, flaked coconut (desiccated coconut)
  • -3/4 cup raisins (or sultanas)
  • Or simply Lotus Paste and or Red Bean Paste (if you do add this filling, you don't need any more mixing or ingredients, just stuff it inside the dough)


  • Glaze
- 1 lightly beaten egg

-  2 tablespoons of water


Procedure

1. Make the moon cake dough. In one bowl, mix the flour, milk powder, and salt together.


2. Break the eggs into another bowl. Add the sugar, and beat together for up to 5 minutes. Pour in the melted butter, vanilla extract. Fold through all ingredients.


 3. Add the sifted, dry ingredients to the liquid mixture. Fold in to create a dough.


4. Knead the dough. Tip the dough onto a floured surface and knead lightly. Once smooth, the dough is ready. Roll a log shape from the dough. If possible, at this point it is helpful to let the dough sit in the refrigerator overnight, as this makes it easier to work with. Cut into evenly sized rounds. There will be approximately 15 to 20 pieces.


5. Make the filling. Mix the apricot preserves, chopped dates, coconut and raisins together in a small bowl. Use a fork to mash down any large, chunky pieces of apricot.

6. Preheat the oven to 375ºF/190ºC/Gas mark 5. Prepare two baking sheets by covering in parchment paper.

7. Press each dough piece into a 3-inch (7.5 cm) circle. When stretching the dough, make the edges thinner and the center thicker.

8.Add the filling. Press the filling into the middle of each circle. Gather the edges over to enclose the filling and pinch closed. Roll into a ball, then flatten.

9.Prepare the moon cake press. Add flour to it to help ease the cake out after pressing. Then, press each flattened circle in the mold to shape the moon cake. To remove each pressed cake, bang all four sides, until it comes out. If you don't have a moon cake press, try to shape the cake as round as possible and use a fork or a skewer to draw a design. It can be as simple as making a cross or a series of lines, or more elaborate if you're patient. Another alternative is to press a design from a thoroughly clean stamp (from a craft store), chocolate mold, or similar mold into the top of the rounded cake.

10. Brush each moon cake with egg wash. Place each cake about 1 inch (2.5cm) apart on a baking sheet. Once each baking sheet is filled, put them into the oven.

11. Bake for 30 minutes or until the moon cakes turn golden brown.


12. Remove from the oven. Leave to cool on a wire cooling rack. Once cooled, they are ready to serve or package. 


I hope these procedures helps.

Personally, qt prefers green tea and lotus flavor of  moon cakes. Those are super yummy! <3

you can eat moon cakes with green tea. this combination is the best! jjang!


alright! Exams are coming real soon! time to study! AND LESS FOOD :((

xoxo

Monday, June 2, 2014

Tau Fu Fah 豆腐花 | Desert for the Chinese


Kei Foong Tau Fu Fah and soybean milk shop

Tau Fu Fah
Ready for the traditional dessert in Ipoh?

Tau Fu Fah is the Cantonese name for soy bean curd, which is served in sweet syrup or Malacca sugar syrup as a Chinese traditional dessert.

Still remember the road named Dato Tahil Azar Road? In between the Hakka Mee restaurant and the Salty Chicken restaurant, there is a small shop, named "Kei Foong" or "Funny Mountain".

Erm... The shop is just about the size of a store room. Don't be surprise, this is indeed the famous soybean milk and dessert shop.

I think this is one of the oldest dessert stall in Ipoh. It's been 3 generations, over 50 years. My dad used to bring me here for my favorite dessert when I was a kid.
Okay, back to the stall. Why would people coming to this little stall until causing traffic jam? (People usually just park the car along the road and have a drink in the car before they continue their journey, the stall is really too small for more tables.)

Everyday, the boss started to prepare the drink and dessert early in the morning. The whole process consumes about 3 hours. By following the secret recipe from his ancestor, the soybean drink and dessert taste nice, smooth and rich in nutrient. 

In addition, it is claimed that only the water in Kinta Valley/Ipoh can make this Chinese traditional dessert as smooth and tasty as it is. Therefore, you will never find another branch of it in anywhere within the Malaysia.

And guess what, it costs you less than RM3 to taste this yummy dessert! How could you resists to have a try on it?

Address: No. 49, Jalan Dato Tahil Azar, 30300 Ipoh, Perak.
Tel: 012-5886167
Operating Time: 10.30am - 7.30pm (closed every 2-3 weeks, not fixed)

However if you are not Ipoh Lang, you can always make yourself one. No worries, I will guide you.  Firstly all you need to do is prepare all the ingredients as follows:-

Homemade Tau Foo Fah (豆腐花)/ Soymilk Custard


Soymilk ingredients:
 
300gms soya beans, soaked overnight
1.8L water

1. Blend the soya beans with water ( i did that in 4 portions)
2.Pour the soya milk into a cheesecloth ( i used a clean baby cloth diaper) and squeeze out the soya milk ( also did that for couple of times) into a large pot.
3. Before putting the soya milk on boil, i actually strained the soya milk again to ensure it's totally grainless.
4.Boil the soya milk ( make sure it's totally boiled.)

from the pot..after scooping the bubbles out

soft and silky smooth
Soymilk custard /Tau Foo Fah (makes around 7 bowls)
Ingredients A

5 1/2 cups of boiling soy milk

Ingredients B

1 tbsp cornstarch
1/2 tsp GDL
1/4 cup cold water

Ginger sugar syrup

6 tbsp sugar
1 cup water
1 piece of old ginger, thumbsized, crushed
(bring to a boil until sugar dissolves)

Method:
 
1.In a small cup, mix ingredients B
2. Pour the boiling soy milk in a gushing motion at 2 ft above the pot with GDL mixture.
3.Give the mixture a quick stir and cover it with a cloth before putting the lid on. Leave for 30 minutes.
4.Scoop away the layer of bubbles on top of the soy milk custard and now ready to serve.
            Mission Accomplished!!!!!!!
 

Saturday, May 31, 2014

2/6/2014 | GUESS WHAT

Happy weekend guys, the time now is 12.50 a.m. and I am writing this blog, 
JUST FOR YOU! ((Touched? :P


Something really, really, REAR-LY traditional is what I am going to introduce to you guys today *WINK*
Let me give you some hints: 
  • Dragon Boat Festival?
  • Bamboo Leaf?
  • Glutinous Rice plus a lot of other stuffs?
.
.
.
.
.
.
.
... YES, it is the famous BAMBOO LEAF DUMPLING or in Chinese we called it as ZONGZI (粽子).


Nah, the appearance of the ZONGZI, :)

Not forgetting, the Dragon Boat Festival is just around the corner so quick, make you and your family Zongzi! 
*Gentle Reminder: It falls on 2th of June this year, ok ;)*

Back to the topic of this bamboo leaf dumplings, they originated from China and were made for commerating the death of Qu Yuan that drowned himself in the MiLuo river after penning the Lament for Ying. According to the legend, packets of rice were thrown into the sea to prevent the fish from eating Qu Yuan body. :(

The fillings of the zongzi varies according to one's preference, there are:

  1. Red bean paste
  2. Char Siew (Chinese barbecued pork)
  3. Salted duck eggs
  4. Salted pork fat
  5. Chinese sausages......... AND MANY MORE!

So today since we lived in Malaysia where the Malays, Chinese and Indian live together harmonically, I gonna share with you all one recipe of Zongzi which is edible no matter what race you are! :D

*CLAPS*

Here is the recipe of the RED BEAN PASTE BAMBOO LEAF DUMPLING, phewwwww, the name is so long! x_x

To kick start you must have all the ingredients ready. The ingredients are as follow:


  • 1kg of glutinous rice, soaked overnight and drained ✔ 
  • 400g of red beans, soaked overnight ✔ 
  • 250g sugar (adjust to your preference, but have to be sweeter because after boiling they will loose some of their sweetness (; ) ✔ 
  • 4 tbsp of Lye water (salty water) ✔ 
  • 50 pieces of bamboo leaves ✔ 
  • Sufficient grass or rafia strands on a strong hook ✔ 

Yield: 20-25 dumplings
Cooking time: Haha, very LONG 

Okay, lets start with the red bean paste. After soaking overnight, cook the beans either by steaming or boiling until soft. Preferably by steaming although it took longer time. Add in sugar, mix well and put aside.


Basically the sweet red bean paste looks like this! ;)

Next, mix the soaked, drained glutinous rice with lye water until the rice turns yellowish. 


Glutinous rice mixed well with Lye water
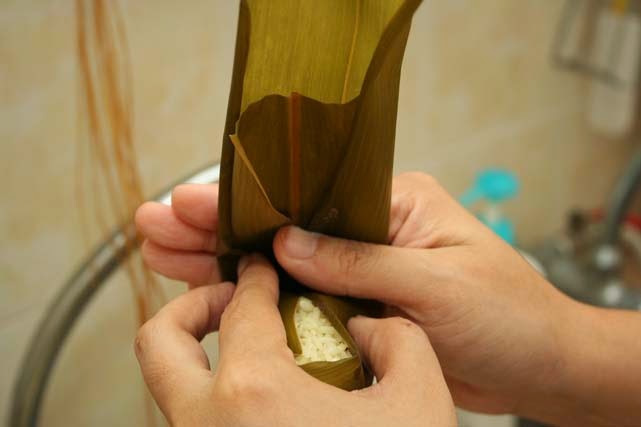
Now, we will start with the tough part ----> WRAPPING. 
Wrapping a good zongzi is NOT an easy job unfortunately. But never mind, I will teach you step by step, ok ;)

Shape the bamboo leaf into a cone
Put a tbsp of glutinous rice
Add 2 tbsp of red bean paste
Cover with 2 tbsp of glutinous rice


Next, place all the Zongzi in a big pot filled with water. Steam for 2 to 3 hours for best texture!


Ready to steam !!!
After steaming, hang to dry around half an hour.


Eat while it is HOT !!
Friendly tip: You can serve it in many ways, with honey, gula melaka syrup, kaya, etc... ♪ ♫ ♩ ♬ 

Ⓨ 

◕.

Thursday, May 29, 2014

A must-try breakfast | Everyone loves this

Here comes Qt-Mario again. This time with a famous Chinese icon.


When people talk about Chinese food,

the first thing comes in mind would be- Bak Kut Teh.
It's common i know. 

Today, Qt is not going to introduce you Bak Kut Teh. 
BUT!
The most important side dish, YOU CHA KUEH!


You Cha Kueh, also known as You Tiao, is like a Chinese style of fried bread stick or doughnut.  Conventionally, youtiao are lightly salted and made so they can be torn lengthwise in two. Youtiao are normally eaten at breakfast as an accompaniment for soy milk or rice congee.

Before everything, you need ingredients.

Ingredient A:
1/4 tsp instant yeast
1 tsp sugar
1 tsp flour
1 tbsp warm water

Ingredient B:
250ml warm water
1 tsp bicarbonate of soda
3/4 tsp alum powder
3/4 tsp ammonia powder
1 tsp salt

300 gm flour

oil for deep frying


After you prepare all those above, you should start making your own You Cha Kueh!

1. Mix ingredient A and leave for few mins for the yeast to react.
2. Mix ingredient B . 
3. Make a well in the flour, pour B and A into it. Mix well. 
4. Leave to rise for 2 hours. 
5. Transfer to a floured board and stretch it long and about 3" width. 
6. Heat a wok with oil to 250 C. Cut the dough as think as your finger . Place one strip on top of each other. Stretch a little and dip into the hot oil. 
7. Let it golden brown on both side. Drain the oil.
8. Eat with kaya or condense milk or Soy milk!


If you think all those steps above it's too troublesome: Qt strongly suggest you to just buy a few sticks from the stall! Some You Cha Kueh outside is real nice!


If you want to know those taste guaranteed ones,
find us! 
We won't mind to share!


So here are some photos.

Skillful hawker :)

FRY FRY FRY! 


Yum yum!


okay i guess this is all. Don't miss Qt too much. Qt will be back! <3

xoxo